
A professional headshot is more than a nice photo; it is often your first handshake with a client, recruiter, colleague, or online audience. The good news is that you do not need a studio, expensive camera, or professional photographer to create a polished image. With planning, good lighting, careful posing, and simple editing, you can take a headshot at home that looks confident, approachable, and credible.
TLDR: Choose a clean background, use soft natural light, dress for the impression you want to make, and take many photos so you can select the strongest one. Position your camera at eye level, keep your expression relaxed, and pay attention to small details like posture, hair, and shadows. Edit lightly to improve brightness and color, but avoid filters that make the image look artificial.
Start With the Purpose of Your Headshot
Before you pick an outfit or move furniture around, decide what your headshot needs to communicate. A LinkedIn profile photo for a corporate role may need to look polished and composed, while a headshot for a creative portfolio can feel more expressive. A real estate agent might want to appear warm and trustworthy; a consultant may want to project clarity and expertise.
Ask yourself three quick questions:
- Where will this photo appear? LinkedIn, company website, speaker bio, resume, email signature, portfolio, or social media?
- Who is the audience? Employers, clients, collaborators, customers, or industry peers?
- What impression should it create? Confident, friendly, innovative, calm, authoritative, energetic, or approachable?
These answers will guide your clothing, background, expression, and overall style. A strong DIY headshot does not need to look dramatic; it needs to look intentional.
Choose the Right Background
Your background should support the image, not compete with it. The safest option is a plain wall in a neutral color such as white, gray, beige, soft blue, or muted green. Avoid busy wallpaper, cluttered shelves, visible cables, laundry, distracting artwork, or anything that pulls attention away from your face.
If you want personality, use it carefully. A blurred bookshelf can suggest knowledge, a bright studio wall can feel creative, and an office environment can add context. However, the simpler the background, the more professional the result usually looks.
Stand or sit at least three to six feet away from the wall if possible. This creates separation between you and the background, helping avoid harsh shadows and making the photo feel more dimensional. If you stand too close to the wall, the image can look flat and passport-like.
Use Natural Light Like a Pro
Lighting is the most important part of a professional-looking headshot. Even a high-end camera will produce an unflattering image in bad light, while a phone can create excellent results in soft, even light.
The best DIY lighting setup is usually near a window. Face the window directly or turn slightly toward it. This gives your face soft illumination and attractive catchlights in the eyes. Avoid standing with a bright window behind you, because it can make your face appear dark and shadowy.
For best results:
- Shoot during the day, ideally in the morning or late afternoon when the light is softer.
- Avoid direct harsh sunlight on your face, which can create squinting and strong shadows.
- Use a sheer curtain to diffuse bright window light if needed.
- Turn off overhead lights if they create yellow tones or shadows under your eyes.
- Use a white poster board or foam board to bounce light onto the shadow side of your face.
If you do not have access to good window light, a ring light or softbox can help. Place it slightly above eye level and in front of you, not directly under your chin. The goal is natural-looking brightness, not a glossy influencer-style glare.
Pick an Outfit That Works on Camera
Your outfit should fit well, reflect your professional identity, and keep the attention on your face. Solid colors usually photograph better than tiny patterns, stripes, or loud prints. Jewel tones, navy, charcoal, forest green, burgundy, cream, and soft pastels often work well, depending on your skin tone and background.
Think about contrast. If your background is light, a medium or dark top can help you stand out. If your background is dark, a lighter or brighter top may be better. Avoid wearing clothing that blends too closely with the wall behind you.
Here are a few outfit guidelines:
- Choose structure. Blazers, collared shirts, neat sweaters, and clean necklines often photograph well.
- Avoid logos, unless the photo is specifically for a branded team page.
- Iron or steam clothing before the shoot; wrinkles are surprisingly visible.
- Keep jewelry simple so it does not distract from your expression.
- Wear something comfortable, because discomfort often shows in your face and posture.
It is also smart to photograph two or three outfit options. What looks best in the mirror may not be the strongest choice on camera.
Set Up Your Camera or Phone
You can absolutely take a professional headshot with a modern smartphone. The key is stability and positioning. Use a tripod if you have one. If not, place your phone on a stack of books, a shelf, or a stable surface. The camera should be at eye level or just slightly above it. Shooting from below can distort your face and create an unflattering angle.
Use the rear camera if possible, because it is usually higher quality than the front-facing camera. Turn on the timer or use a Bluetooth remote so you are not reaching toward the camera. If your phone has portrait mode, test it, but do not rely on it blindly; sometimes artificial blur can make hair, glasses, or shoulders look odd.
Frame the photo from mid-chest or upper torso upward, leaving some space above your head. A headshot should show your face clearly, but it does not need to be an extreme close-up. Keep your eyes around the upper third of the frame for a balanced composition.
Master the Pose
A good headshot pose looks natural, but it is rarely accidental. Start by standing or sitting tall. Imagine a string gently lifting the crown of your head. Relax your shoulders, lengthen your neck slightly, and bring your chin forward just a little, then down slightly. This may feel unusual, but it helps define the jawline and prevents the head from pulling backward.
Instead of facing the camera completely straight-on, turn your shoulders about 10 to 30 degrees to one side, then bring your face back toward the lens. This creates shape and makes the pose more dynamic. Keep your hands out of the frame unless you are intentionally creating a wider portrait.
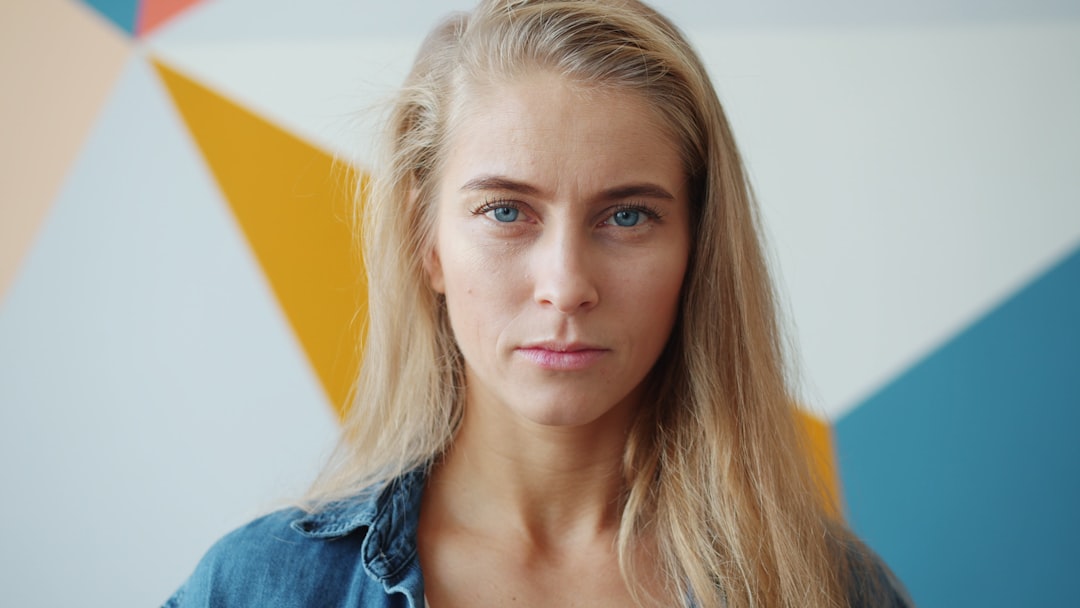
Your expression matters as much as the technical setup. Aim for a relaxed, genuine look. Think of someone you like, take a slow breath, and let your smile begin in your eyes rather than forcing it at the mouth. Try several expressions: a full smile, a small smile, and a calm neutral expression. Different uses may call for different moods.
Take More Photos Than You Think You Need
Professional photographers do not take one photo and hope for the best. They take many. You should too. Small changes in angle, expression, posture, and light can make a huge difference. Plan to take at least 50 to 100 shots in short rounds.
Try variations such as:
- Facing slightly left, then slightly right
- Smiling with teeth and without teeth
- Changing your chin position subtly
- Moving closer to or farther from the background
- Trying different outfit options
- Adjusting the camera height by a few inches
Review the photos on a larger screen if possible. A picture that looks sharp on a phone may reveal blur, awkward shadows, or distracting details when enlarged.
Pay Attention to Grooming and Details
Before you begin, check the small things. Smooth flyaway hairs, clean your glasses, remove lint, straighten collars, and make sure makeup, if worn, looks even in natural light. If you have shiny skin under bright lighting, a small amount of translucent powder or blotting paper can help reduce glare.
Glasses can be tricky because they may reflect windows, lamps, or the phone screen. If you see glare, slightly tilt the glasses downward, move the light source, or change your head angle. Do not tilt so much that the glasses look unnatural.
Also check the background one last time. A plant growing out of your head, a crooked frame, or a visible trash bin can weaken an otherwise excellent photo.
Edit Lightly and Professionally
Editing should improve the photo, not transform it into something unrealistic. Start with basic adjustments: crop, exposure, contrast, white balance, and sharpness. Make sure your skin tone looks natural and the image is neither too warm nor too cool.
A strong professional edit usually includes:
- Brightness adjustment so your face is clearly visible
- Subtle contrast to add depth
- Color correction for natural skin tones
- Cropping for the platform where the image will be used
- Minor blemish cleanup only if it does not change your real appearance
Avoid heavy filters, excessive smoothing, artificial eye brightening, or dramatic background blur. People should recognize you immediately when they meet you in person. Your headshot should be your best professional presentation, not a different version of you.
Format for Different Platforms
Once you choose your final image, save multiple versions. LinkedIn and many social platforms use square or circular profile crops, so make sure your face is centered and not too close to the edges. For websites, speaker bios, and press kits, you may also want a larger rectangular version.
Keep one high-resolution file for future use and create smaller copies when needed. A crisp, properly sized image looks more professional than one that is stretched, compressed, or blurry.
Common DIY Headshot Mistakes to Avoid
- Using a cluttered background: It makes the photo look casual and distracts from your face.
- Shooting in harsh light: Strong sunlight can create deep shadows and squinting.
- Holding the camera by hand: This often causes awkward angles and blur.
- Overediting: Too much smoothing or filtering can reduce credibility.
- Wearing overly busy clothing: Fine patterns can create visual distortion on screen.
- Choosing the first decent shot: Compare several options before deciding.
Final Checklist Before You Publish
Before uploading your new headshot, ask whether it looks clear, current, and appropriate for your professional goals. Your face should be well lit, your expression should feel natural, and the image should be sharp. The background should be simple, the crop should be flattering, and your clothing should match the level of professionalism expected in your field.
A DIY professional headshot is not about pretending to be in a studio. It is about using the resources you have thoughtfully. With a quiet space, good light, a steady camera, and a little patience, you can create a headshot that helps people see you as capable, approachable, and ready for opportunity.